
Welcome to the Canon FX Repair Manual, your comprehensive guide to troubleshooting, disassembling, and repairing the Canon FX camera. Designed for photographers and technicians, this manual provides detailed steps for resolving common issues, ensuring your camera operates flawlessly. With hands-on guidance and practical advice, it’s an essential resource for maintaining and restoring your Canon FX.
1.1 Overview of the Canon FX Camera
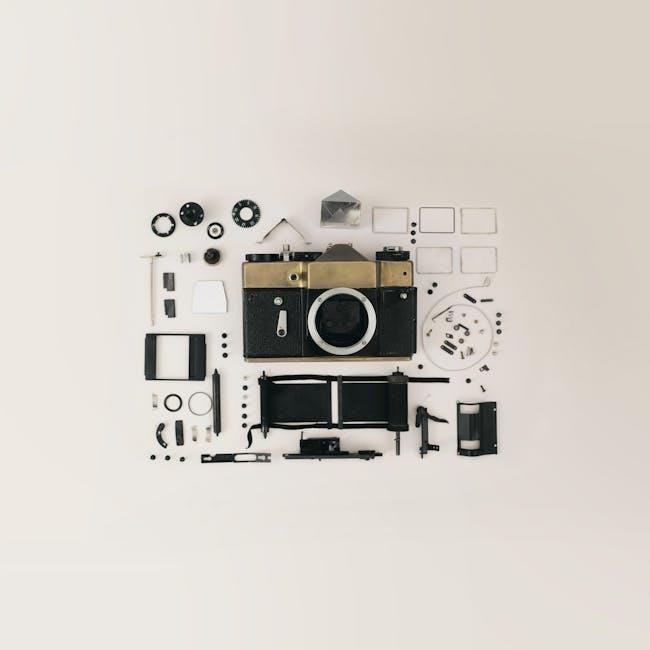
The Canon FX is a 35mm SLR camera known for its durability and reliability, featuring a blend of mechanical and electrical systems. Popular among professionals and enthusiasts, it offers interchangeable lenses and manual controls, making it versatile for various photography needs. While robust, common issues like film transport jams and shutter malfunctions can arise, emphasizing the importance of proper maintenance. This manual provides insights into its mechanics, helping users understand and address these challenges effectively, ensuring optimal performance and longevity of the Canon FX camera.
1.2 Importance of a Repair Manual
A repair manual is essential for understanding and addressing issues with the Canon FX camera. It provides detailed instructions for troubleshooting, disassembling, and repairing components, empowering users to resolve problems independently. By following the manual, photographers can save costs on professional services and ensure their camera operates optimally. The manual also serves as a valuable resource for maintaining the camera’s performance and extending its lifespan. With clear guidance, it helps users diagnose and fix common issues, ensuring their Canon FX continues to deliver exceptional results.
1.3 Scope of the Canon FX Repair Manual
This manual provides a detailed guide for diagnosing and repairing issues with the Canon FX camera. It covers essential maintenance, troubleshooting common problems, and step-by-step repair procedures. The scope includes tools required, safety precautions, and workspace setup. Additionally, it addresses disassembly, component replacement, and reassembly processes. The manual is designed for both professionals and DIY enthusiasts, ensuring comprehensive coverage of mechanical and electrical systems. By following the instructions, users can restore their Canon FX to optimal functionality, addressing film transport, shutter, aperture, and light meter issues effectively.
Understanding the Canon FX Camera Mechanics
Understanding the Canon FX Camera Mechanics explores the intricate design and functionality of its components, ensuring optimal performance and reliability. This section delves into the mechanical and electrical systems, highlighting how they integrate to provide precise control over exposure and film transport.
2.1 Key Components of the Canon FX
The Canon FX features a robust design with essential components like the film transport system, shutter mechanism, aperture control, and light meter. The film transport ensures smooth loading and advancing, while the shutter mechanism controls exposure time. The aperture system regulates light intake, and the light meter provides accurate exposure readings. Understanding these components is crucial for effective repair and maintenance, ensuring optimal performance and longevity of the camera.
2.2 Mechanical and Electrical Systems
The Canon FX camera relies on a harmonious blend of mechanical and electrical systems to function seamlessly. Mechanically, it features intricate gears, springs, and levers that control film transport, shutter operation, and aperture adjustments. Electrically, it incorporates circuits, sensors, and motors to manage light metering, exposure control, and battery-powered functions. Understanding these interconnected systems is crucial for effective troubleshooting and repair, as issues in one area often affect others. Proper maintenance ensures optimal performance and longevity of the camera’s complex mechanisms.
2.3 Common Issues and Their Causes
The Canon FX often experiences issues like film counter malfunctions, jammed film transport, and shutter mechanism problems. These issues stem from worn gears, dirt accumulation, or improper handling. Film counter errors can arise from faulty sensors or misalignment, while film jams are typically caused by debris or damaged transport components; Shutter issues may result from worn curtains or incorrect timing adjustments. Regular maintenance, such as cleaning and lubricating moving parts, can prevent these problems. Understanding these causes is key to effective troubleshooting and repair.

Tools and Equipment Required for Repair
Essential tools include precision screwdrivers, pliers, and lubricants. Safety gear like gloves and goggles is crucial. A well-lit workspace with organized parts ensures efficient repair processes.
3.1 Essential Tools for Canon FX Repair
To successfully repair your Canon FX, gather essential tools like precision screwdrivers (flathead and Phillips), tweezers, and plastic spudgers for delicate parts. A loupe or magnifying glass helps inspect small components. Pliers and a torque driver are useful for adjusting or tightening specific mechanisms. A clean, anti-static workspace is crucial to prevent damage. Lubricants and cleaning solutions, such as isopropyl alcohol and silicone grease, are necessary for maintaining moving parts. Ensure all tools are of high quality to avoid damaging the camera’s intricate components during the repair process.
3.2 Safety Precautions and Protective Gear
When working on your Canon FX, prioritize safety to avoid damage or injury. Use an anti-static wrist strap to prevent static discharge, which can harm electronic components. Wear safety glasses to protect your eyes from flying debris. Gloves provide grip and protection for your hands. Ensure your workspace is well-lit and free from hazards. Keep loose clothing tied back and avoid jewelry that could snag parts. Ground your tools and workspace to prevent static buildup. Always unplug or remove batteries before starting repairs to eliminate power-related risks.
3.3 Workspace Setup for Efficient Repair
Setting up a well-organized workspace is crucial for efficient repair of your Canon FX camera. Begin by clearing a clean, stable workbench and ensure proper lighting to illuminate small components. Use an anti-static mat to prevent damage to sensitive electronics. Organize your tools and parts in labeled containers to avoid misplacement. Keep essential materials, such as lubricants and replacement gears, within easy reach. A clutter-free environment reduces the risk of losing parts or causing accidental damage, ensuring a smoother repair process.
Troubleshooting Common Problems
This section guides you through diagnosing and resolving common Canon FX issues, such as film counter malfunctions and transport jams, using detailed repair tutorials and manuals.
4.1 Film Counter Malfunction
A film counter malfunction on the Canon FX can prevent accurate tracking of exposures. Symptoms include the counter not advancing or resetting properly. This issue often stems from mechanical misalignment or dirt in the gear system. To resolve this, inspect the film transport mechanism for obstructions or wear. Clean or replace faulty components as needed. Refer to the Canon FX repair manual or online tutorials for step-by-step guidance. Ensuring proper function of the film counter is crucial for accurate film management and consistent photography results.
4.2 Film Transport Issues
Film transport issues in the Canon FX often stem from dirt, worn gears, or improper film loading. A common problem is the film counter not advancing, which can halt the camera’s operation. Another issue is film jamming, causing incomplete frame spacing. To address this, inspect the film transport mechanism for debris or misalignment. Clean the rollers and gears, and ensure the film is loaded correctly. If the issue persists, replacing worn parts or adjusting the transport system may be necessary. Always refer to the repair manual for detailed guidance on resolving these specific problems effectively.
4.3 Shutter and Aperture Problems
Shutter and aperture issues are common in the Canon FX, often caused by worn curtains, misaligned blades, or faulty timing mechanisms. Symptoms include inconsistent exposures, slow shutter speeds, or a stuck aperture. To address these, inspect the shutter curtains for tears or dirt and clean or replace them as needed. Adjust the shutter timing using specialized tools, and ensure the aperture blades are properly calibrated. Lubricate moving parts and check for electrical connectivity issues in the aperture control system. Regular maintenance can prevent these problems from escalating, ensuring precise control over exposures and camera functionality.
4.4 Light Meter and Exposure Issues
Light meter inaccuracies and exposure problems are common in the Canon FX. Issues may stem from faulty sensors, outdated batteries, or misaligned aperture mechanisms. Start by checking and replacing batteries, as low power can disrupt meter readings. Next, adjust the light meter calibration to ensure accurate exposure measurements. If problems persist, inspect the sensors or circuitry for damage and replace them if necessary. Properly functioning light meter and exposure systems are crucial for capturing well-exposed images, making these repairs essential for optimal camera performance.
Disassembling the Canon FX Camera
Start by removing the top cover to access internal mechanisms. Ensure delicate components are handled with care to avoid damage during disassembly.
5.1 Removing the Top Cover
To remove the top cover of the Canon FX, start by taking out the screws located on the top plate. Gently pry the cover using a flathead screwdriver, ensuring not to damage the surrounding components. This step provides access to internal mechanisms for further repair. Handle with care to avoid scratching the camera’s exterior or harming delicate parts inside.
5.2 Accessing the Internal Mechanisms
After removing the top cover, carefully take out additional components like the film counter and shutter speed dial to expose the internal mechanisms. Gently disconnect any cables or wires connected to these parts. Use a screwdriver to remove screws securing the main mechanism plate. Lift the plate slowly, ensuring no wires are tangled or damaged. This step provides direct access to the camera’s core systems, such as the shutter, aperture, and film transport. Handle components with care to avoid damage or misalignment during the repair process.
5.3 Handling Delicate Components
When working with the Canon FX, handle delicate components like the shutter curtains, light meter sensors, and gear trains with extreme care. Static electricity can damage sensitive electronics, so ground yourself using an anti-static strap or touch a grounded metal object. Use precision tweezers for small parts and avoid touching optical surfaces. Clean delicate mechanisms with a soft-bristled brush or compressed air. Never force parts into place, as misalignment can cause irreversible damage. Always refer to the exploded diagrams in the manual for proper orientation and reassembly techniques.

Repairing the Film Transport System
Fixing the film transport system requires diagnosing jams, cleaning mechanical components, and replacing worn gears or springs. Adhere to detailed instructions for effective repair.
6.1 Identifying Jam Causes
Film jams in the Canon FX often result from dirt, dust, or improper film loading. Check for obstructions like tangled film or debris in the transport system. Misaligned rollers or gears can also cause jams. Worn or damaged components, such as teeth on gears or springs, may prevent smooth film advancement. Additionally, improper engagement of the film leader or incorrect tension during loading can lead to issues. Inspect the film path thoroughly and ensure all parts are clean and functioning properly to diagnose the root cause effectively.
6.2 Cleaning and Lubricating Moving Parts
Cleaning and lubricating the Canon FX’s moving parts is crucial for smooth operation. Use a soft-bristled brush to gently remove dust and debris from gears and mechanisms. Dampen a microfiber cloth with isopropyl alcohol to wipe down surfaces, avoiding excessive moisture. Apply a lightweight grease to pivot points and gears, ensuring proper lubrication without attracting dust. Regular maintenance prevents wear and tear, keeping the film transport system functioning reliably. Always use compatible lubricants to avoid damaging components.
6.3 Replacing Damaged Gears or Springs
Replacing damaged gears or springs in the Canon FX requires precision and care. Start by identifying the faulty component using the exploded diagrams from the service manual. Acquire genuine replacement parts to ensure compatibility. Use specialized tools to disassemble the affected area gently. Remove the damaged gear or spring, taking note of its position and alignment. Install the new part, ensuring proper seating and lubrication if required. Reassemble the mechanism step-by-step, referring to the manual for guidance. Test the camera’s functionality post-replacement to confirm successful repair.

Fixing the Shutter and Aperture Mechanism
Addressing shutter and aperture issues requires careful inspection and precise adjustments. Start by examining the curtains for wear or damage, ensuring proper alignment and timing. Clean or replace faulty components, and recalibrate the aperture system for accurate light control. Regular maintenance and professional guidance can prevent future malfunctions, ensuring optimal camera performance.
7.1 Adjusting Shutter Timing
Adjusting the shutter timing on your Canon FX camera is crucial for ensuring accurate exposure control. Begin by accessing the shutter mechanism, typically located behind the lens. Use a screwdriver to gently remove any protective covers. Once exposed, inspect the shutter curtains or blades for proper alignment and synchronization. If misaligned, carefully adjust the timing using the adjustment screws provided. It’s important to refer to the Canon FX repair manual for specific calibration steps to avoid over-correction. After adjustments, test the shutter with a timing device to confirm precise operation. Proper synchronization ensures optimal exposure, enhancing image quality significantly.
7.2 Replacing Worn-Out Curtains or Blades
Replacing worn-out curtains or blades in the Canon FX shutter mechanism requires precision. Start by accessing the shutter assembly, ensuring the camera is disassembled properly. Inspect the curtains for tears or damage. Use specialized tools to remove the old curtains, taking care not to damage adjacent components. Install the new curtains, aligning them accurately to maintain synchronization. Reassemble the mechanism and test the shutter to ensure proper function. This step is crucial for restoring accurate exposure control and image quality.
7.3 Calibrating the Aperture System
Calibrating the aperture system ensures precise control over light exposure. Start by adjusting the aperture blades to ensure they open and close accurately. Use a small screwdriver to fine-tune the calibration screws, referencing the official Canon service manual for specific instructions. Test the aperture at various f-stops to confirm proper function. If issues persist, consider replacing worn-out blades or consulting a professional. Regular calibration maintains optimal image quality and prevents exposure errors. Always handle delicate components with care to avoid further damage.

Repairing the Light Meter and Exposure System
Learn to diagnose and fix issues with the Canon FX’s light meter and exposure system. Check and replace batteries, adjust calibration, and repair faulty sensors for accurate readings.
8.1 Checking and Replacing Batteries
Begin by inspecting the battery compartment for corrosion or damage. Ensure the batteries are installed correctly, matching the polarity indicators. If the light meter or exposure system malfunctions, try replacing the batteries with fresh ones. Use a multimeter to verify battery voltage matches the manual’s specifications. Properly dispose of old batteries and store spares in a cool, dry place. Regular battery checks prevent unexpected shutdowns during use. Always refer to the Canon FX service manual for compatible battery types to maintain optimal performance and avoid electrical system damage.
8.2 Adjusting Light Meter Calibration
Calibrating the light meter ensures accurate exposure readings. Start by setting the ISO and aperture to known values. Use a screwdriver to adjust the calibration potentiometer, located near the meter circuit. Compare readings with a reference light source, such as a gray card or calibrated meter. Fine-tune the potentiometer until readings align. Repeat the process for multiple aperture and shutter speed settings to ensure consistency. Proper calibration is crucial for precise exposures, especially in manual modes. Always test the camera post-calibration to confirm accuracy.
8.3 Replacing Faulty Sensors or Circuitry
Replacing faulty sensors or circuitry in the Canon FX requires precision. Start by identifying the malfunctioning component using diagnostic tools. Carefully desolder and remove the damaged sensor or circuit, ensuring minimal disruption to surrounding parts. Install the new component, following the manufacturer’s specifications. Reassemble the camera and test the light meter and exposure system to confirm proper functionality. Always consult the official Canon service manual for accurate replacement procedures and part numbers to ensure reliability and performance.
Reassembling the Canon FX Camera
Reassembly requires careful alignment of components, ensuring all parts fit precisely. Use the official Canon FX repair manual and exploded diagrams for guidance. Test functionality post-reassembly.
9.1 Reattaching the Top Cover
Reattach the top cover by aligning the screws with their respective holes. Gently secure it using the screws provided, ensuring they are tightened evenly. Avoid over-tightening to prevent damage. Once the cover is in place, verify that all buttons and dials function correctly. Double-check the alignment to ensure a proper fit, as misalignment can lead to operational issues. Finally, test the camera to confirm everything works as expected after reassembly.
9.2 Ensuring Proper Alignment of Parts
Proper alignment of parts is critical during reassembly to ensure the Canon FX functions correctly. Use the exploded diagrams from the service manual as a reference to verify the correct positioning of components. Align screws, gears, and levers precisely to avoid misalignment, which can lead to mechanical issues. Double-check the fit of the top cover and internal mechanisms, ensuring they sit flush and even. A misaligned part can cause operational failures, so take your time and refer to the manual or tutorial videos for guidance. This step requires patience and attention to detail to guarantee optimal performance.
9.3 Testing the Camera Post-Repair
After reassembling the Canon FX, conduct a thorough functionality test. Load film, check the shutter operation, and ensure the aperture blades move smoothly. Verify the film counter advances correctly and exposures are accurate. Test all modes, including manual and aperture priority. Inspect for light leaks and proper frame spacing. Use a test roll to confirm consistent results. Finally, ensure the light meter provides accurate readings. A systematic approach ensures reliability and confidence in the repair’s success.
Maintenance and Prevention Tips
Regular cleaning and proper storage are crucial for the Canon FX’s longevity. Use official manuals and community tutorials to guide maintenance and prevent common issues effectively.
10.1 Regular Cleaning and Lubrication
Regular cleaning and lubrication are crucial for maintaining the Canon FX’s performance. Use a soft, dry cloth to wipe down external surfaces and a lightly dampened swab for internal components. Compressed air can remove dust from crevices. Lubricate moving parts sparingly with a high-quality, camera-specific grease or silicone-based lubricant to ensure smooth operation. Avoid over-lubrication, as it can attract dust and cause malfunctions. Clean the film transport system regularly to prevent jams and ensure reliable film advancement. Proper maintenance will extend the camera’s lifespan and keep it functioning optimally.
10.2 Storage and Handling Best Practices
Proper storage and handling are crucial to maintaining the Canon FX camera’s condition. Store the camera in a cool, dry place, away from direct sunlight and moisture. Use a protective case or pouch to prevent scratches and dust accumulation. Avoid extreme temperatures, as they can damage internal components. When handling, ensure your hands are clean and dry to prevent oils from damaging sensitive parts. Regularly inspect the camera for signs of wear or corrosion. Proper care ensures longevity and optimal performance, reducing the need for frequent repairs.
10.3 Preventing Common Wear and Tear
Preventing wear and tear on your Canon FX involves regular maintenance and careful handling. Clean the camera body and lenses with soft cloths, avoiding harsh chemicals. Lubricate moving parts periodically to ensure smooth operation. Store the camera in a dry, cool place, away from direct sunlight; Avoid exposing it to extreme temperatures or humidity. Handle the camera gently to prevent mechanical stress. Regularly inspect and replace worn-out components before they cause further damage. By following these practices, you can extend the lifespan of your Canon FX and maintain its optimal performance.
Resources for Further Learning
Explore official Canon service manuals, online forums, and repair tutorials for in-depth guidance. Visit the Learn Camera Repair Facebook Group for affordable, member-created resources and expert advice.
11.1 Official Canon Service Manuals
Official Canon service manuals are invaluable resources for repairing the Canon FX camera. These manuals provide detailed exploded diagrams, repair procedures, and parts lists. They are available as PDF downloads, such as the central-manuals-camera_canon_EF_Repair_EN.pdf, which includes comprehensive guidance. Some manuals may require a small fee for download, supporting site maintenance. These documents are essential for understanding complex repairs and ensuring accuracy. They are often hosted on platforms like the Internet Archive, offering reliable access to original Canon repair guides.
11.2 Online Communities and Forums
Online communities and forums are invaluable resources for Canon FX repair. Groups like the Learn Camera Repair Facebook Group offer tutorials and member-written guides, often at minimal cost. Websites such as photot.com provide repair insights and videos for models like the Canon FTB and TX, addressing issues like film transport jams. These platforms foster collaboration, allowing enthusiasts and technicians to share experiences and solutions. Engaging with these communities can enhance your repair skills and provide real-time support for troubleshooting specific issues with the Canon FX camera.
11.4 Repair Tutorials and Videos
Repair tutorials and videos are invaluable resources for visual learners, offering step-by-step guidance for Canon FX repairs. Websites like the Internet Archive and YouTube host detailed videos, such as one demonstrating the removal of the top cover on a Canon F-1 to address film counter issues. Another tutorial highlights causes of film transport jams in the Canon FTB and provides repair solutions. These visual guides complement written manuals, making complex repairs more accessible. They often include real-time demonstrations, helping technicians diagnose and fix issues efficiently. Such resources are especially useful for those new to camera repair, providing hands-on examples to enhance understanding and confidence.
In conclusion, the Canon FX repair manual helps restore your camera. Regular maintenance and troubleshooting ensure longevity. Use official manuals and online forums for support.
12.1 Summary of Key Repair Steps
The Canon FX repair manual guides you through essential steps to restore your camera. Start by diagnosing common issues like film transport malfunctions or shutter problems. Use specialized tools to disassemble and access internal mechanisms carefully. Follow detailed instructions for cleaning, lubricating, or replacing parts. Reassemble with precision and test functionality post-repair to ensure everything works. Refer to official manuals or online tutorials for visual aids. Regular maintenance, like cleaning and proper storage, prevents future issues. This manual ensures your Canon FX operates smoothly, capturing memories with reliability and precision.
12.2 Encouragement for DIY Repair
Embracing DIY repair for your Canon FX camera can be an incredibly rewarding experience. Not only does it save costs, but it also fosters a deeper understanding of your equipment. With the right tools and a detailed manual, you can confidently address common issues like film transport jams or shutter malfunctions. The sense of accomplishment from restoring your camera to optimal condition is unparalleled. Don’t hesitate to take the first step—your Canon FX deserves the care, and so does your passion for photography. DIY repair is more than fixing; it’s preserving.
12.3 Final Tips for Successful Repair
Always refer to the official Canon FX repair manual for precise instructions. Use genuine parts to ensure reliability and longevity. Test each function thoroughly after repair to confirm proper operation. Keep the camera clean and well-maintained to prevent future issues. Stay patient and methodical during the process, as rushing can lead to mistakes. For complex problems, consider consulting online forums or professional technicians. Regularly update your skills with new repair techniques to handle evolving camera technologies effectively.