
Installing a Delta shower door requires careful planning and precise execution. Our guide provides detailed instructions for a seamless experience. Ensure you have all necessary tools and materials before starting. Proper installation guarantees durability and functionality, enhancing your bathroom’s aesthetic. Refer to the Delta Shower Door Installation PDF for comprehensive steps and troubleshooting tips. For any queries, Delta’s customer support is readily available.
Overview of Delta Shower Doors
Delta shower doors are renowned for their durability, stylish designs, and ease of installation. Available in various models, including sliding and pivot options, they cater to different bathroom layouts. The C500 series, for instance, offers frameless glass enclosures with sleek finishes like brushed nickel. These doors are designed to enhance bathroom aesthetics while providing reliable performance. Detailed installation instructions are provided in the Delta Shower Door Installation PDF, ensuring a smooth setup process. With their commitment to quality and customer support, Delta shower doors remain a popular choice for homeowners seeking modern and functional solutions.
Importance of Proper Installation
Proper installation of Delta shower doors ensures durability, functionality, and safety. Misalignment or poor sealing can lead to leaks and premature wear. Following the Delta Shower Door Installation Instructions PDF guarantees a flawless setup, preventing issues like water seepage and door misalignment. It also ensures compliance with warranty terms, offering peace of mind. Proper installation enhances the overall performance and aesthetic appeal of the shower door, making it a worthwhile investment for any bathroom. Regular maintenance, as outlined in the guide, further extends the product’s lifespan.
Benefits of Using Delta Shower Doors
Delta shower doors offer a blend of style, durability, and functionality. Their sleek designs enhance bathroom aesthetics while providing excellent water containment. The doors are crafted with high-quality materials, ensuring long-lasting performance. Easy-to-follow installation instructions, like those in the Delta Shower Door Installation PDF, make setup straightforward. Additionally, Delta shower doors are low-maintenance and resistant to soap scum and water stains. They also come with comprehensive warranties, offering peace of mind. With Delta, you get a perfect combination of form and function for your bathroom.
Preparation for Installation
Preparation involves checking the shower area, reading the Delta Shower Door Installation PDF instructions thoroughly, ensuring all parts are included, and preparing the necessary tools for the process.
Tools and Materials Needed
To ensure a smooth installation, gather all necessary tools and materials as specified in the Delta Shower Door Installation PDF. Essential tools include a screwdriver, tape measure, drill, and wrench for securing hinges and handles. Additionally, double-check that all hardware components like screws, brackets, and seals are included. Proper preparation prevents delays and ensures accuracy. Always verify the compatibility of materials with your shower door model to avoid any installation issues. Follow the instructions carefully for a successful setup.
Understanding the Installation Manual
The Delta Shower Door Installation PDF provides a detailed guide to ensure a successful setup. It includes diagrams, step-by-step instructions, and safety precautions. Reading the manual thoroughly is crucial to avoid mistakes. Pay attention to specific measurements and hardware requirements. The guide also offers troubleshooting tips for common issues. For visual learners, Delta provides accompanying installation videos. Always follow the manual’s instructions to guarantee proper installation and maintain warranty validity. If unsure, contact Delta’s customer support for clarification. This ensures a smooth and stress-free installation process.
Pre-Installation Checklists
Before starting your Delta shower door installation, ensure you have all necessary tools and materials. Check the shower area for proper measurements and structural integrity. Confirm that all hardware and parts are included in the package. Review the installation manual thoroughly to understand each step. Ensure the wall studs are secure for mounting brackets. Verify that the shower door aligns with your bathroom’s dimensions. Double-check local plumbing and building codes for compliance. Prepare a clean, dry workspace to avoid any installation hindrances. This preparation ensures a smooth and efficient installation process.

Step-by-Step Installation Guide
Begin by reading the Delta Shower Door Installation Instructions PDF thoroughly. Prepare all tools and materials. Align the frame with the shower opening, ensuring level placement. Secure the panels to the frame and mount the hardware. Adjust hinges and handles for proper alignment. Double-check all connections and ensure water-tight seals. Follow each step carefully to achieve a professional finish.
Preparing the Shower Area
Before starting the installation, ensure the shower area is clear of obstructions. Clean the walls and floor to prevent debris from interfering with the installation. Check for any damage or uneven surfaces that may affect the door’s alignment. If necessary, apply a layer of silicone sealant to the wall edges for a watertight fit. Ensure the shower is completely dry to avoid any slipping hazards during the process. Proper preparation ensures a smooth and successful installation of your Delta shower door.
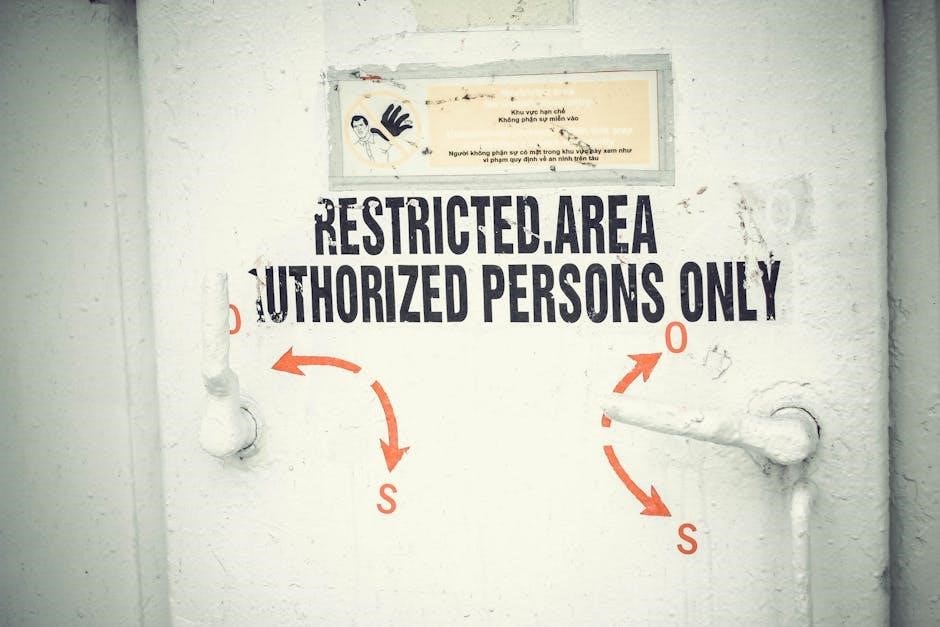
Installing the Shower Door Frame
Start by aligning the shower door frame with the prepared wall area, ensuring it is level and plumb. Mark the wall for drilling pilot holes, then secure the frame using the provided screws or wall anchors. Double-check the alignment to ensure the frame is perfectly square. Once the frame is in place, tighten all fasteners firmly but avoid overtightening, which could damage the material. Apply a thin layer of silicone sealant around the edges for a watertight seal. Refer to the Delta Shower Door Installation PDF for specific measurements and torque specifications.
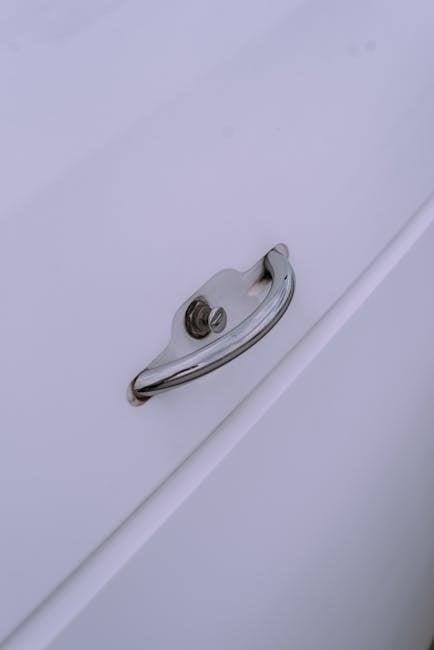
Mounting the Hinges and Handles
Begin by attaching the hinges to the shower door, ensuring they align with the frame’s hinge receptors. Secure the hinges to the door panel using the provided screws. Next, attach the other side of the hinges to the frame, making sure they are level and properly aligned. For the handles, screw them into place on both sides of the door, ensuring they are evenly spaced and aligned. Tighten all screws firmly but avoid overtightening. Refer to the Delta Shower Door Installation PDF for precise measurements and torque specifications to ensure a secure and functional installation.
Securing the Door Panels
To secure the door panels, align them with the frame and ensure they fit properly into the hinge receptors. Use the provided screws to fasten the panels to the hinges, tightening them evenly. Apply rubber gaskets or seals to create a watertight connection. Double-check the alignment to avoid any gaps or misalignment. Once secured, attach the handles to the panels, ensuring they are tightly fastened but not overtightened. Finally, test the door’s movement to ensure smooth operation and proper sealing. Refer to the Delta Shower Door Installation PDF for specific torque recommendations.
Adjusting and Aligning the Door
After securing the panels, adjust the door to ensure proper alignment with the frame. Use the adjustment screws or bolts to align the hinges and panels. Check the door’s vertical and horizontal alignment using a level tool. Ensure the door swings smoothly and evenly without hitting the frame. Once aligned, tighten all adjustment points firmly. Test the door’s movement to confirm it opens and closes effortlessly. Proper alignment prevents wear and tear, ensuring the door functions optimally. Refer to the Delta Shower Door Installation PDF for specific adjustment guidelines and torque recommendations.
Common Issues and Troubleshooting
Address door misalignment by checking hinge adjustments and ensuring proper frame installation. Fix leaks by inspecting seals and reapplying silicone if necessary. For hardware malfunctions, refer to the Delta Shower Door Installation PDF for repair or replacement guidance. Regular inspections help prevent issues, ensuring long-term functionality and appearance.
Addressing Door Misalignment
Door misalignment is a common issue during Delta shower door installation. To fix this, start by ensuring the frame is level and securely fastened. Check the hinges for proper alignment and adjust screws if necessary. If the door still doesn’t align, re-examine the installation manual for guidance. Gently tighten or loosen hinge bolts to achieve balance. For persistent issues, refer to the Delta Shower Door Installation PDF for detailed troubleshooting steps. Proper alignment ensures smooth operation and prevents wear on hardware. Regular checks can prevent future misalignment.
Fixing Leaks and Water Seepage
Leakage and water seepage are common issues that can arise after installing a Delta shower door. To address this, inspect the door frame and seals for any gaps or improper alignment. Apply silicone sealant around the edges to ensure a watertight fit. Check the door’s alignment with the frame, as misalignment can cause leaks. Tighten any loose screws or hinges and ensure the door closes securely. Regularly cleaning the tracks and drains can also prevent water buildup. Refer to the Delta Shower Door Installation PDF for detailed sealing instructions and troubleshooting tips. Proper maintenance ensures long-lasting performance.
Handling Hardware Malfunctions
Hardware malfunctions, such as loose hinges or faulty handles, can disrupt the functionality of your Delta shower door. Inspect the door’s moving parts regularly to identify wear and tear. Tighten any loose screws or bolts, and lubricate hinges if necessary. If a part is damaged, refer to the Delta Shower Door Installation PDF for replacement instructions. Ensure proper alignment of the door and frame to prevent strain on the hardware. Addressing these issues promptly prevents further damage and maintains smooth operation. For severe malfunctions, contact Delta’s customer support for assistance.
Maintenance and Care Tips
Regularly clean your Delta shower door with a mixture of water and white vinegar to prevent soap scum buildup. Wipe down the door and frame after each use to avoid water stains. Inspect hinges and handles for wear and tear, lubricating them as needed. Refer to the Delta Shower Door Installation PDF for detailed maintenance schedules and care instructions to ensure longevity and optimal performance.
Cleaning the Shower Door
Clean your Delta shower door regularly using a mixture of water and white vinegar to remove soap scum and water spots. Avoid harsh chemicals, as they may damage the glass or hardware. Use a soft cloth or squeegee to wipe down the door after each use, preventing mineral deposits from forming. For tougher stains, apply a gentle glass cleaner and rinse thoroughly. Regular cleaning maintains the door’s transparency and prevents the buildup of mold or mildew. Refer to the Delta Shower Door Installation PDF for additional care tips to ensure longevity.

Preventing Soap Scum and Hard Water Stains
To prevent soap scum and hard water stains, clean your Delta shower door regularly with a water-repellent glass treatment. After each use, wipe the door with a squeegee to remove water droplets. Apply a soap-scum remover monthly to break down residue. For hard water stains, use a solution of white vinegar and water or a specialized cleaner. Avoid abrasive materials that could scratch the glass. Regular maintenance ensures the door remains clear and functional. Refer to the Delta Shower Door Installation PDF for detailed cleaning and prevention tips to maintain your shower door’s appearance.
Regular Inspections for Wear and Tear

Regular inspections are crucial to maintain the condition and functionality of your Delta shower door. Check hinges, handles, and door seals every 6-12 months for signs of wear. Ensure all hardware is secure and properly aligned. Inspect glass panels for scratches or etching caused by hard water. Address any issues promptly to prevent further damage. Keep a record of inspections to track maintenance and ensure longevity. Refer to the Delta Shower Door Installation PDF for guidance on identifying and addressing wear and tear effectively.
The successful installation of your Delta shower door marks the completion of a well-executed project. Proper testing ensures functionality and durability. Refer to the Delta Shower Door Installation PDF for final checks and maintenance tips. For any remaining questions, Delta’s customer support is available to assist.
After completing the installation, perform a thorough final check to ensure all components are secure. Test the door’s movement, alignment, and sealing. Inspect for any leaks or gaps. Verify that hinges and handles function smoothly. Check the installation against the Delta Shower Door Installation PDF guide to confirm compliance. Proper testing ensures longevity and optimal performance. Address any issues promptly to prevent future problems. This step is crucial for a flawless and durable shower door setup.
Delta shower doors come with a comprehensive warranty covering defects in materials and workmanship. For details, refer to the Delta Shower Door Installation PDF guide. Customer support is available for assistance with installation, troubleshooting, and maintenance. Visit the Delta website or contact their support team for inquiries or replacement parts. Ensure all warranty conditions are met during installation to maintain coverage. Delta’s commitment to quality and customer satisfaction ensures peace of mind for homeowners. Access the official Delta Shower Door Installation PDF guide for detailed instructions and diagrams. Watch installation videos on Delta’s YouTube channel for visual guidance. FAQs and troubleshooting tips are also available online to address common concerns and ensure a smooth installation process. The Delta Shower Door Installation PDF Guide is an essential resource for a successful installation. This comprehensive document provides step-by-step instructions, detailed diagrams, and troubleshooting tips. To access it, visit the official Delta Faucet website and navigate to the “Support” section. From there, select “Product Manuals” and search for your specific shower door model. The PDF can be downloaded instantly, ensuring you have all the information needed at your fingertips. Regularly updated, it reflects the latest installation best practices. Visual guidance enhances the installation process, and Delta provides instructional videos to help you install your shower door confidently. These videos demonstrate step-by-step procedures, highlighting key details like hinge alignment and panel securing. Available on platforms like YouTube and Delta’s official website, they complement the PDF guide, offering a hands-on perspective. Watching these videos ensures clarity, especially for complex tasks. Updated content and 24/7 accessibility make them a valuable resource for DIY enthusiasts and professionals alike. Use them alongside the PDF for a seamless experience. Frequently Asked Questions address common concerns during Delta shower door installation. Users often inquire about preventing water leaks, aligning doors properly, and handling hardware malfunctions. Questions also include tips for maintaining glass clarity and troubleshooting installation issues. Additional queries focus on warranty coverage and replacement parts. Delta’s customer support is a reliable resource for resolving these concerns. Referencing the installation PDF and video guides can also provide clarity. These FAQs ensure a smooth experience, covering everything from initial setup to long-term maintenance.Final Check and Testing
Warranty and Customer Support Information
Additional Resources
Accessing the Delta Shower Door Installation PDF Guide

Watching Delta Shower Door Installation Videos
FAQs and Common Questions